Friday, February 27, 2015

Tomato and Lime Shrimp

I love complicated recipes. You know, the ones where the ingredients list runs a full page and there are at least a couple of pages of instructions. 

But every so often, there will be a recipe that is short and simple that catches my eye, mostly due to the ingredients.

This recipe from Honest Cooking is one of those. Shrimp, lime juice, tomatoes? Sign me up.

I got started by giving the onion a rough chop. The recipe calls for a jalapeno, but none were to be found at the market. But never fear, I just upped the crushed red pepper flakes for some heat. 

The onions and crushed pepper got a good saute, until the onions had softened.


Next up were the tomatoes. I knew it would be impossible to use Campari tomatoes and, quite frankly, I'm not sure how available they are in the States.

Instead I drained two cans of diced tomatoes (reserving the liquid). The tomatoes were added to the onions, along with some, and everything simmered for a bit. As the tomatoes started to break down, I added a bit of the reserved liquid to keep everything from drying out.


The lime juice was then added and then the shrimp. As soon as the shrimp turned pink, the pan was taken off the heat.

Now the recipe recommends serving it with pieces of baguette. I decided to go in a different direction and plated it over rice, garnished with chopped cilantro.


It only took one bite to know this was a keeper. The taste of the tomatoes really comes through, the zip of the lime juice is just enough to make your taste buds sing, and the shrimp turned out juicy and delicious.

And while we ate all the shrimp, there was still a decent amount of sauce leftover. We plan on putting it on our next pizza for a real taste treat.

Sometimes simple is better.

Cultured Butter

In my last post, I shared how to make quick and easy butter. A Facebook friend, Noelle, commented that her husband makes cultured butter. Intrigued by this, I started reading up on the subject. Apparently cultured butter has a tang to it and is smooth and glossy looking. Plus it takes a bit of planning and time (mostly unattended).

And here are some other fun facts to know and tell:
  • Raw or pasteurized cream can be used
  • If using pasteurized, it will need some sort of culture added to the cream, such as mesophilic yogurt, cultured buttermilk, or Milk Kefir Grains.  
  • If using raw cream, it will culture all on its own at room temperature.
I lucked out because I had raw cream at my disposal. So let's see how this kitchen adventure unfolded.

For this butter round, I used four bags of cream (about 30 ounces). The bags were poured in a bowl and stood at room temperature for about 20 hours.


I could tell once time was up that something had been going on. The cream went from a thick, fluid state to being set. The bowl got popped into the fridge for five hours to stop the culturing process.

To give you some idea how thick the cream got, here's what a scoop of it looked like after coming out of its refrigerator hibernation:


I must admit that I was tempted to just stop the recipe process right then and there. The cream looked so, ummm, creamy and delicious, and just screaming to be spread on some lovely warm bread. But being the intrepid kitchen maven, I got a hold of my senses and soldiered on.

Knowing how much liquid came out of my original butter batch, I figured it would be best to divide this batch in half.

So half of the cultured cream got put into the bowl of the standing mixer. Using the whisk attachment, beating commenced. Here is the cream when it hit soft peak stage:


Keeping the mixer on about medium speed, the cream continued to whip until I saw the water beginning to separate. At that point, I backed down the mixer speed. Most of the solids worked themselves into the whisk:


Using a rubber spatula, the butter was removed from the whisk and plopped into a large bowl. Using a slotted spoon, I was able to retrieve any whipped bits that were still in the bowl. 

The liquid that was in the bottom of the bowl, the buttermilk, got poured into a measuring cup. 

I repeated the whipping process with the remaining cream.

The final amount of buttermilk that was extracted:


With the full batch whipped and now in the bowl, I poured some purified water over the butter.


I used a wooden spoon to rather smush up (a technical term dontcha' know) the butter to extract the remaining buttermilk. After smushing for a bit, the water got poured off and clean water was put in. I repeated the smushing process until the water was clear and the last traces of buttermilk were gone.


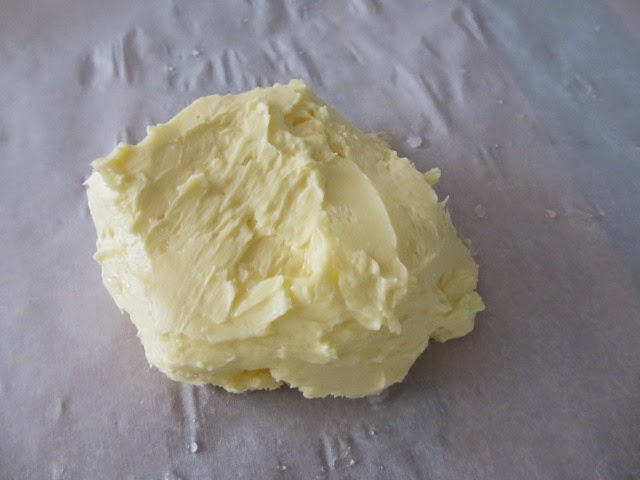
Not having any fancy-schmantzy butter molds, I free-formed a block of butter on a piece of parchment paper:


The final yield of butter was about 13 ounces from the original 30 ounces of cream. 

Without a doubt, this butter was smooth (ignore my spatula marks) and glossy. I had already taken the quick and easy butter that was made the day before out of the fridge. Now it was time for the taste test.

David and I tried the quick and easy butter first. And guess what? It tasted like butter! Then we sampled the cultured version. This one was richer, a bit more tangy, and a delight. I can't wait to see if we notice any difference when I cook and bake with it.

David wondered if the taste difference was substantial enough to warrant the extra time. I think it is. But I will say that if I'm in a hurry, have raw cream on hand, and need butter right away, the quick and easy method will be the way I go.

Noelle, thank you for introducing me to another level of butter heaven. 

But before ending this post, I have some notes that may possibly be of some use for those looking to try this recipe:
  • I initially put the cream on the counter, covered with a couple of colanders. This was mostly to keep the cat princess, Bronte, from taking a sample. Later in the day, I put the bowl into an unheated oven to ensure the cream was cat proof.

  • Now that warmer weather is setting in, I may need to shorten the time of leaving the cream to culture at room temperature. 
  • Remember that buttermilk that I reserved? Well call it providence, karma, fate, whatever, but while my butter was doing it cultural thing, a recipe for banana buttermilk bread appeared on my Facebook news feed. Will be making that in the next day or two and will post results.
  • Butter molds are in my future.

Monday, February 23, 2015

Butter (Quick and Easy)

One of the quirks of living in Corozal is that there are times when certain grocery store items disappear from the shelves. Right now, the missing item is butter.

This is the brand I use. 


Actually, it's about the only brand to choose from, unless you prefer margarine or canned butter.


During a previous butter shortage, I did try the canned stuff. But I really didn't like the taste.

Instead of waiting and hoping for the reappearance of butter, I decided to make my own.

It's dead easy and fast to do.

I took two bags of cream and poured them into the bowl of my standing mixer.


Using the whisk attachment, I beat the cream on medium speed. It started to thicken, go into a whipped state, then the water started to separate from the solids. At that point, I lowered the mixer speed, so as to not have the water flying about outside the bowl.


I put the solids in a cheesecloth lined colander and let it finish draining off any remaining water.

End result? Badda Bing, Badda Bam, Butter!

Saturday, February 21, 2015

Chicken with Bacon and White Wine

Let me start by giving a big shout-out to Sonja Jamison for bringing this recipe to my attention. Clearly it contains some of my favorite things, meaning chicken, bacon, and wine. My friend knows me well.

I started off by browning the bacon,...


...while my sous chef, Olivia, offered to help take care of any bacon bits that may fall to the floor.


Next it was time to dredge the chicken thighs with flour, salt, pepper, and Herbes de Provence. Another Sonja shout-out! She and her husband, Dan, gifted me with some spices when they were here last year. This spice combo has always been one of my favorites. 


The thighs were pan fried until golden brown on both sides and set aside.


Next up were the onions. The recipe calls for shallots, but they aren't something I've found in the Corozal markets. As a result, a humble yellow onion was thinly sliced and sauteed until it got soft.

I then added the white wine (the remainder of the bottle being consumed by the chef). All those lovely brown bits were scrapped up, then the chicken stock went in the pot. I also added a healthy teaspoon of the Herbes de Provence to keep that flavor going. That all simmered for a bit until it started to reduce. 


I put the chicken and bacon bits back into the pan, and put it into a preheated 350-degree oven for 40 minutes. 

The recipe calls for basting the thighs every 10 or so minutes with the pan sauce. It became quickly apparent that there really wasn't enough sauce to make basting possible. So I just flipped the chicken every so often to ensure both sides got some lovin'.

I let the chicken rest, out of the oven, for about 15 minutes. That gave me plenty of time to cook some couscous.

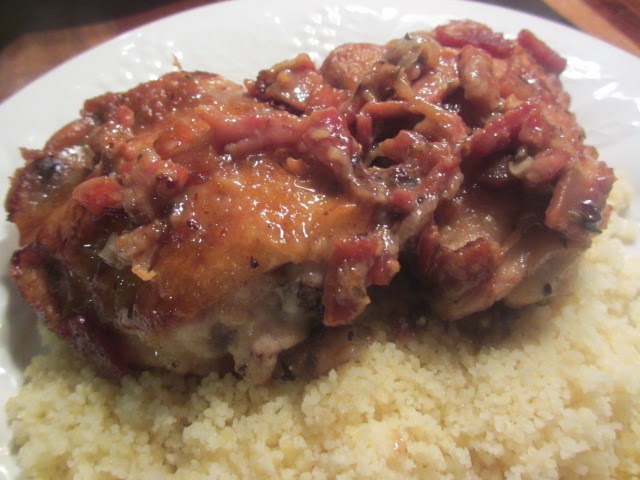
The final plating:


Our thoughts? Overall, the flavors were terrific. Unfortunately, there just wasn't enough pan sauce. I don't think I over reduced the stock/wine mixture, so I'm not sure what happened. I'd like to try it again and double the pan sauce ingredients, which should make a difference. 

The other change I would make is to use skinless thighs. While the skins were crispy prior to putting the pot in the oven, they lost that quality during the cooking process. 

But all in all, this recipe has lots of merit and deserves another go. I'm so glad David doesn't mind being a guinea pig.

Thursday, February 19, 2015

Mustard and Chickpea Fritters

While I realize chickpeas don't appeal to everyone, David and I think they are a grand legume. Slightly nutty in flavor, great texture, and so versatile. I've used them in a variety of soups, stews, sauces, and, of course, hummus.

So when I saw this recipe, I just knew I had to try making these fritters. 

Right off the bat, I should mention that I didn't use canned chickpeas. Yes, it makes life easier and the prep faster, but I've found that using the dried peas provide far more flavor and a much nicer texture. Better still, I can control the sodium level.

The night before making the fritters, I soaked the chickpeas in a bowl of water. The next day, I put them in a pot, covered them water, and let them simmer for about 35-40 minutes. 

When they were done, I gave them a few pulses in the food processor and was good to go for making the rest of the recipe.

The mashed chickpeas were put into a bowl, and I added the onion, garlic, egg, Dijon mustard, salt, and some pepper.


After combining the ingredients, the mixture seemed too dry, so I added another egg. 

I ended up adding two tablespoons of flour to achieve the desired consistency -- a mixture that was firm, but still a bit moist.

Canola oil was heated in a cast iron pan, the chickpea mixture was formed into patties (I got eight), and they were cooked in batches -- about four minutes a side.

Time to plate! I was originally thinking of putting the fritters on top of a salad, but as I had just made a batch of flour tortillas, decided to use them as a base instead.


I know the recipe called for a Harissa Aioli for the sauce, but I wanted something with a bit more kick. So I mixed some Sriracha into a bit of mayo.

The result? You guys...these were so amazingly good! I initially thought the fritters would be more like over-sized falafel, but that wasn't the case. These fritters are denser, but moist. The Dijon mustard adds just the right amount of kick, and the mayo/Sriracha sauce helped bring everything together.

This a recipe I want to play with more. I'm thinking that some oven roasted garlic would work or browning some garlic slices in olive oil. That would add some nice texture. Another thought we had was folding in some sort of seafood. Doubt if I can get crab, but shrimp might work.

At the end of the day, these fritters are so tasty that even non-chickpea lovers might become converts.


Saturday, February 14, 2015

Banana, Coconut, Chocolate Chip Cake

While there are sometimes shortages in the stores for some basic things (right now no butter can be found), there is one item we always know will be plentiful and available in our own backyard.

Behold the beauty of bananas!


Our banana trees are quite prolific, so I'm always on the lookout for recipes. This one recently caught my eye, and I gave it a try yesterday.

The recipe calls for two bananas. However we have, what are referred to as, apple bananas. They're smaller and sweeter than the their bigger sisters. I mashed up four, due to their smaller size.

The eggs, brown sugar, vanilla, and coconut oil were added and whisked together.


Flour and salt were sifted into the wet ingredients, then chocolate chips and shredded coconut were folded in.

Once combined, I put the batter in a pan lined with parchment paper.


The pan was placed in a pre-heated 350-degree oven and left to bake for about 45 minutes.

After cooling on a wire rack, it was time for the official taste test.


In short, we loved them! While this called a cake, the texture is denser -- more like a brownie. The coconut oil brings a lovely moistness and subtle flavor, while the bananas and chocolate chips provide just the right balance of sweetness. 

With this being so quick to pull together and tasty to boot, there's no doubt I'll be making these again and again.

Tuesday, February 10, 2015

Tortillas

Flour and corn tortillas are plentiful and cheap here in Corozal. For the longest time, we bought them at one of the local stands in town. But as time went on, I was curious about making my own.

I tried a few different recipes and finally came up with one that we really like, and it also has a fun kitchen hack.

What you'll need:
1 1/2 cups all purpose flour (I use Bebe Agua)
1/2 cup whole wheat flour
1 teaspoon baking powder
1 teaspoon salt
3 tablespoon shortening or lard
3/4 cup water

Equipment:
Cast iron pan or comal [koh-MAHL]
1 gallon size zip-lock bag
Rolling pin

Step One:
Place the flours, baking powder, and salt in the bowl of a food processor, then add your shortening.


I often use vegetable shortening, but this time around I scooped in bacon fat. Hey, if lovin' it is wrong, then I don't want to be right.

Step Two:
Pulse the mixture a few times to incorporate the shortening. Then slowly pour the water in.

The mixture should come together. 


If the dough is too dry, add a bit more water. If the dough is too wet, add a bit of flour.

Step Three:
Knead the dough by hand until soft, smooth, and elastic, then form into a ball. Cover with damp paper towels and let it sit for about 15 minutes.

Pre-heat your comal or cast iron pan over medium high heat.


Step Four:
While the dough is resting, cut the zipper off the plastic bag and cut down each side.


Step Five:
Divide the dough into eight pieces. Roll each piece into a ball. Place one of the balls between the plastic bag.


Step Six:
Roll the dough into a circle, turning the bag 1/4 turn after each you roll it out. This will help keep the dough in a circle.


Step Seven:
Gently pull the rolled out tortilla away from the plastic and place on the heated pan.


Step Eight:
Let the tortilla cook, undisturbed, for a couple of minutes. When you see the edge start to brown, carefully flip over.


Step Nine:
Place the cooked tortilla on a tea towel and cover it. I have found slightly overlapping them seems to keep them more pliable than stacking them between the towels.

Step Ten:
Repeat the process for the remaining pieces of dough. Depending on your stove and pan, you may need to adjust the temperature to ensure even browning.


Step Eleven:
Gobble them up!

Pasta Sauce

I've been making my own pasta sauce for a number of years. And while I use any number of recipes, this one is a favorite. It's quick, it's easy, and the taste is amazing.

Ready for the ingredients?

2 14-ounce cans of diced tomatoes
2 medium onions, chopped
2.5 ounces butter
Salt & pepper to taste
Crushed chili flakes (optional)

That's it! Bet you have most, if not all, of these things in your pantry and fridge.

Melt the butter over medium heat, then add the chopped onions and chili flakes  (if using).

Saute the onions and till soft and translucent.


While the onions enjoy their butter bath, place the diced tomatoes into a food processor and give it a couple of pulses. I do this because we like a bit more of a finer texture to the sauce. But if you like your sauce on the chunky side, then this step can be skipped.

When the onions are ready, pour the tomatoes into the pan. Add salt and pepper to taste, then let everything simmer away until the sauce thickens. (Remember to give it a stir every now and again.)


That's all there is to it. But wait until you taste it. I served some up with homemade pasta and some Parm. 


The butter element brings a richness that you won't believe and the real taste of the tomatoes comes shining through.

Just a few ingredients and you can create magic. You may not want to buy jarred or canned sauce ever again.


Sunday, February 1, 2015

Savoiardi (Ladyfingers)

Not long ago, I was discussing the topic of homemade desserts with some friends and one of them mentioned the desire for a really good tiramisu. Having had this dessert before, I knew that two of the key ingredients were Marscapone cheese and ladyfingers. 

Both of these items are not commonly found here in Corozal. So I wondered if I could make them from scratch. 

I decided to tackle the ladyfingers first and searched around for an authentic Italian recipe and landed on this one.

One of the first things I did was to put the required amount of granulated sugar into a mini food processor and pulsed it for a bit. The reason? The sugar here is coarser than what you might find in the States. I've found that it dissolves much better once it gets ground up.

Next I beat egg whites, 1/4 cup of sugar, and lemon juice until they reached the stiff peak stage.


The egg yolks then got whipped with the rest of the sugar, lemon juice, and salt until it was thick and pale yellow.


The flour and cornstarch got sifted over the egg yolk mixture and I folded it in until combined.


The egg whites were then folded in.


I don't have a pastry bag (yet), but I had David cut the corner of a gallon-size ziplock bag by 1/2 inch.

Half the batter was put in the bag and I piped out the ladyfingers onto prepared baking sheets.


At this point, my island countertop looked like a baking war zone.


Powdered sugar was sprinkled over the fingers and left to rest about five minutes, then a another round of powder sugar was applied.

The pans were put into a preheated 350 degree over for about 15 minutes until they turned a light gold color.


The result? When I've purchased store-bought ladyfingers, I always found them a tad bit on the hard, dense side. These are light, airy biscuits with just the right touch of sweetness. They are perfect on their own, but I think they will be the perfect base for a tiramisu.

And what about the Marscapone cheese? Well I found a recipe and plan on giving it a try in the next week or two. If it turns out, I'm two steps closer to making a hopefully authentic Italian dessert!

Torshi Seer (Fermented Garlic)

The idea of fermented garlic intrigued me, so I thought it would be fun to try this recipe, described as a "sweet-tart Persian pickle."

There was just one problem, one of the ingredients is dried barberries. I had never heard of them and would probably have had a tough enough time trying to find them in the States. 

But after some online research, I discovered that dried cranberries are a good substitute. We're starting to see more dried fruit options in some of the grocery stores here, and I scored a big bag of dried cranberries at the local Indian market.

Balsamic and red wine vinegars were put into a saucepan, along with the berries, honey, salt, and thyme. Once the mixture came to a boil, it was poured over the heads of garlic.


The mixture needs to ferment for about six to eight weeks or until the garlic cloves are very soft.

Will let you know how it turns out!

Butter Chicken (Murgh Makhani)

One look at the ingredient list for this recipe, and I was sold. I just love the smell and taste of coriander, cumin, cloves, ginger and the like. And surprisingly enough, I even found cardamom in town. Combine all that with tomatoes and cream, well, I was pretty sure this dish would be a winner.

The first step was making the marinade with all the lovely spices and lime juice.


Everything got mixed together and popped into the fridge overnight.

My intent was to make the dish the next day, but we were involved in a bit of an adventure with our friends. As a result, the chicken marinated for two nights, instead of one.

When the time came to complete the recipe, I started by sauteing some onions in 1/4 cup of butter.


The marinated chicken got added in the pan and cooked for about 10 minutes.


Next the tomato sauce and diced tomatoes were added. A lid got put on, and whole shooting match cooked for 30 more minutes.


Right before serving, this lovely, delicious cream was stirred in.


Oh my.


I plated the chicken and sauce over a bed of Basmati rice and served it with some flatbread.


The sauce is absolutely outstanding and perfectly balanced. I did think there was a bit too much sauce to the ratio of chicken, but that is easily remedied. and speaking of chicken, it did taste a bit tough. But I think that was due to over marinating.

This meal will definitely be making repeat appearances on The Wright Table.


P.S. We used some of the extra butter sauce on top homemade pizza and it was incredibly tasty.